In this tutorial we are going to walk through the steps of importing REAXML files into your WordPress real estate website.
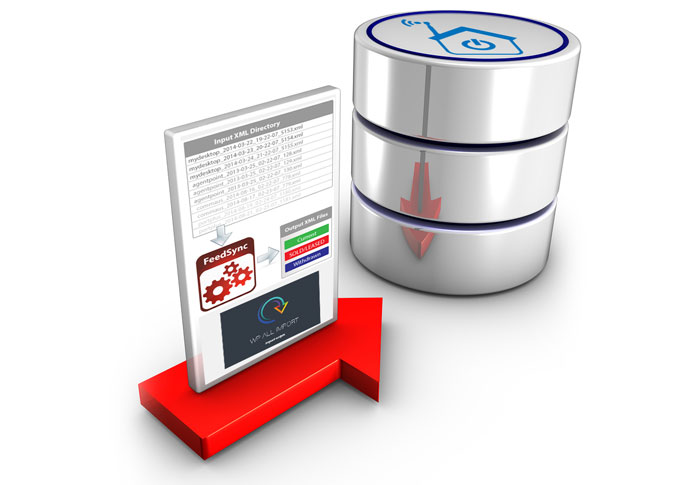
Basically we are going to create two import jobs for each REAXML property element, one for current and one for sold/leased. FeedSync merges the REAXML files and creates three output files: current, sold/leased, withdrawn/offmarket. We only need to import the current and sold/leased as because this is more efficient by reducing import file sizes, leaves the withdrawn/offmarket out of the database.
To do this you are going to need a few tools.
What You Need
- FeedSync: This processes multiple REAXML files into merged files.
- WP All Import Pro: You can import CSV and XML files into WordPress quickly and easily it’s the best import plugin for WordPress.
- WP All Import Scripts: Scripts you can use to configure WP All Import Pro.
- Easy Property Listings: The best real estate plugin for WordPress.
Process your REAXML files with FeedSync
Follow this tutorial on how to process your REAXML files with FeedSync, you will end up with three output XML files that you can use with your WP All Import jobs.
- Current: All latest current and available property elements (residential, rental, land, rural, business, commercial, commercial_land).
- Sold/Leased: All sold and leased properties.
- Withdrawn/Off Market: These are not required to import and are to keep the other two import files smaller.
Optional – Download, install and configure Easy Property Listings
Using Easy Property Listings with your theme will be much easier as all the REAXML custom fields are already configured, and we have written custom scripts for pricing, address, features, multiple agents and much more.
Install and activate WP All Import Pro and import the Scripts
Download a copy of the free WP All Import scripts and unzip the file on your computer. Next install and activate WP All Import on your WordPress site and from within your dashboard go to All Import > Settings. Under the Saved Templates heading press Choose File, and select the scripts that you unzipped, and press Import Templates.
You should now see the saved scripts.

Create your first import job
From your dashboard select, All Import > New Import.
Step 1: Choose Your File
Select the option Download File From URL and paste the FeedSync processed url into the box and press next. It should look something like:
{Your_website_url}/XML/feedsync/?action=do_output&type=residential&status=current
Step 2: Select Elements
Here is where you select the property elements from the Filtering Options section. Type /residential in the Manual XPath box and press Tab to see the Current XML tree.
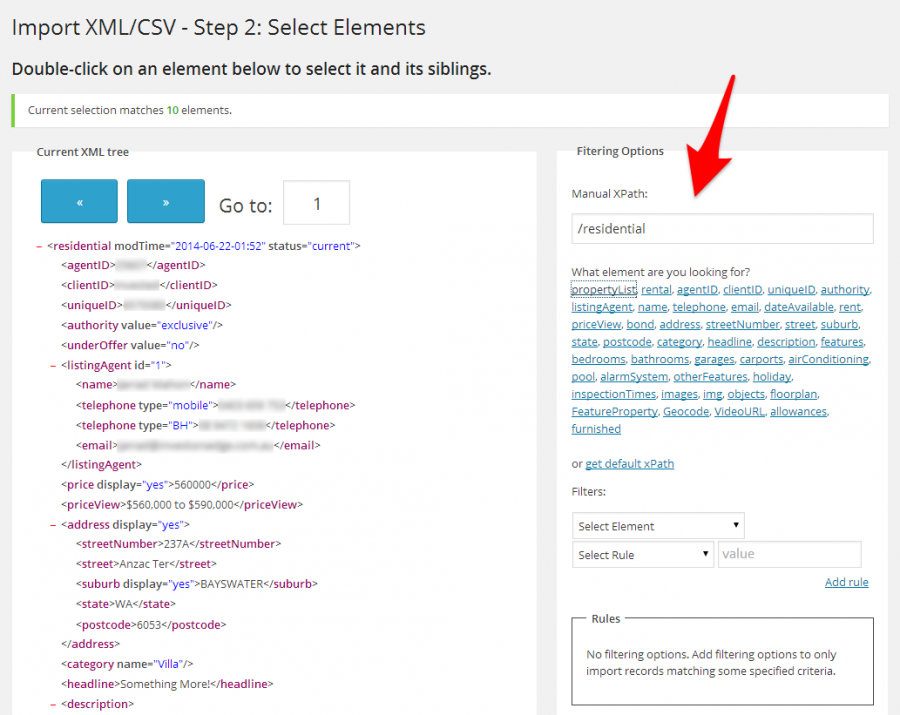
Your real estate site may handle two or three listing types as there are 7 property elements total, but we have to do one at a time.
- residential
- rental
- land
- rural
- business
- commercial
- commercial_land
Once you are happy with the filtered selection press Next.
Step 3: Template Builder
From this page you are setting the Post Title and the Post Content and you can select the template you imported earlier from the Load existing template, select EPL – Content. Press next when you are finished.
Post Title
You are best of using the property address (like the EPL – Content script template) or unique ID with suburb and not the text Heading, Because headings can change several times as agents users tweak and change the descriptive title while managing a leasing or sale. This causes major redirection issues with your site and breaks URLs, e.g. if they link to their listing in an email http://website_url/great-property-by-beach, then they sell it and it becomes http://website_url/great-property-by-beach-under-offer, that link is no longer valid and your re-direction nightmare starts because usually this heading changes 5 times on average.
We know we’ve had problems with properties not appearing on the sites anymore. Stick with the address or unique id-suburb-state combination.
Post Content
You can add more content to the Post Content box here but shouldn’t need to when using Easy Property Listings as all the custom fields are done for you.

Step 4: Options
So far it’s been pretty easy, and using our scripts with WP All Import, it still is… for you!
There are hundreds of options and settings you can tweak here and we will go through them. First select the EPL – Property (Residential) template from the Load existing template selection box to configure the import.
This will select the correct custom post type, configures all the custom fields, inserts the features/location taxonomies, sets the image imports, selects the author(s), and configures the import options for you.
Check: Record Matching
This is where the import determines the unique id of the import element.
Sometimes the script template does not set this setting, it’s very important to set now as it cannot be changed later.
Use {uniqueID[1]}{./@modTime} for the Automatic Record Matching Unique key. You need to add modTime here because the import will only update listings that have a new date-time. This speeds up the import process especially when there are a few hundred listings in the FeedSync processed REAXML files.
Post Authors
This is a tricky part because there can be two listing agents and they do not have a unique id, plus you can’t rely on the email address or phone number as many times they are the same for multiple agents. What you need to do is create a WordPress Author for each agent and make their username first-last in lowercase with a dash.
Primary Post Author
The field has a simple str_relace php function which converts “Merv Barrett” into “Merv-Barrett” by replacing the spaces with dashes. This function is used in author property_agent and property_second_agent custom fields.
[str_replace(" ", "-", {listingAgent[1]/name[1]} )]
Press Finish to save the import job
Repeat the process for each listing type you need
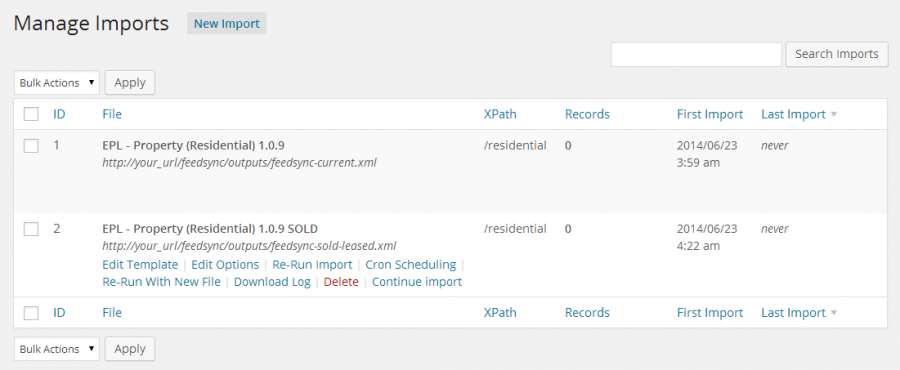
Each element requires two import job, one for current and one for sold/leased but they all use the same WP All Import script templates. All you need to change is the Filtering Options Manual XPath rule: /residential, / land, /rental, /rural, commercial, /commercialLand, business; and the source URL from Step 1.
Remember to update your Friendly Name so you know which import is current or sold.
- EPL – Property (Residential) 1.0.9
- EPL – Property (Residential) 1.0.9 SOLD
- EPL – Rental 1.0.9
- EPL – Rental 1.0.9 LEASED
If all goes to plan you should have lots of listings in the custom post types.
Configure your cron jobs on your cPanel server to run automatically
Once you have created all your import jobs and are happy with how its operating its time to configure your cron jobs. WP All Import needs two cron jobs per import a Trigger Script and Execution Script. You can copy the cron job settings from the imports Cron Scheduling link.
Trigger Script
Every time you want to schedule the import, run the trigger script.
To schedule the import to run once every 24 hours, run the trigger script every 24 hours. Most hosts require you to use “wget” to access a URL. Ask your host for details.
Example:
wget -q -O /dev/null "http://your_url/wp-cron.php?import_key=vaOfEXkM&import_id=1&action=trigger"
Execution Script
The Execution script actually executes the import, once it has been triggered with the Trigger script.
It processes in iteration (only importing a few records each time it runs) to optimize server load. It is recommended you run the execution script every 2 minutes.
It also operates this way in case of unexpected crashes by your web host. If it crashes before the import is finished, the next run of the cron job two minutes later will continue it where it left off, ensuring reliability.
Example:
wget -q -O /dev/null "http://your_url/wp-cron.php?import_key=vaOfEXkM&import_id=1&action=processing"
Adding the cron jobs to cPanel
Log-in to your hosting panel and look for the Cron Jobs icon under the Advanced Tab.
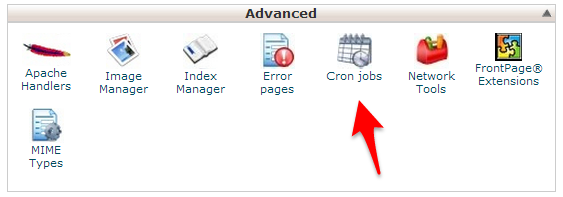
Use the following guidelines when creating your cron jobs.
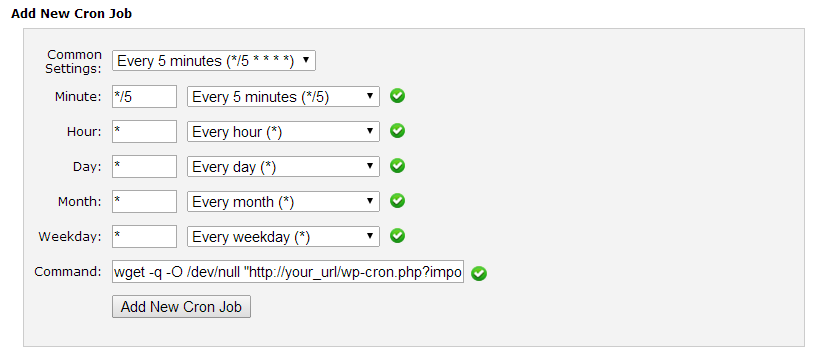
Execution Script
Select Every 5 minutes (*/5 * * * *) from the common settings. Do this for all the import jobs remembering to change the import_id.
Trigger Script
The trigger script can be configured with different run times for current and sold/leased.
Trigger Script – Current
It’s recommend to process the current import job 3/4 times per day as this will minimise the server impact, but offset the Minute option by 10 minutes for each import job. Adjust the Hour to what you require as suggested below.
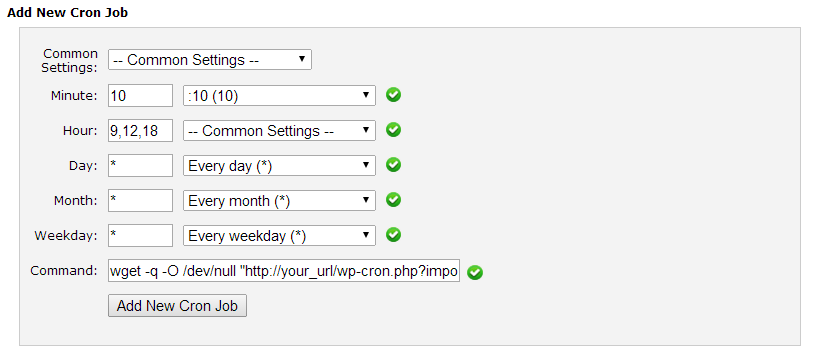
Trigger Script – Sold/Leased
This can be run once at the end of the business day as the sold / leased listings don’t change as often as current listings. Change the Hour to 19 and follow the Minute guidelines.
FeedSync Cron Job
You should also add a cron job for FeedSync that runs 10 minutes before the Trigger Script so the XML files are updated before you import them into your website.
Let us know how you go or if you need some help
Well that just about covers what you need to do to configure WP All Import to process REAXML files automatically. Let me know in the comments below if you found this tutorial useful and how you went setting up your cron jobs for your real estate website.


Can you please update this article for current information.
Is the free version of all import sufficient? If I buy FeedSync, can I get AllImportPro for free please?
Hi
Sorry for the delay in response, just got back from a much needed break.
Unfortunately the free version of WP All Import will not do the job as the free version does not allow import into custom post types and also the server cron jobs for automatic processing. However the product is fantastic and you will no doubt use it for other projects to import any data into WordPress. 100’s of testimonials or other data, it does it all.
Also as WP All import is not created by us we can’t give it away and yes you require FeedSync to prepare the REAXML files to import.
Hope this helps you with your query
Hello,
I have purchased all of the required products and the developer kit:),
we use Rockend software rest professional and will use ftp to transfer the xml files to the feedsync is there away to automate it ?
Aslo great tutorials, I looking to implement it within next week!, I’m finding the cron jobs difficult to understand are there 2?! cron jobs to be done? I know about the xml process one to reaxml confused about the wp all import execution cron how it is done is it through cpanel as well?
Many Thanks.
Rockend Rest has the ability to automatically output REAXML files they call it the Realestate.com.au format and allow you to configure FTP details. Specify the FeedSync/input folder. That should automate the process. Edit some details on a listing to test. Is is supposed to be automatic.
WP All Import requires 2 cron commands per import to be setup. An execution and a trigger. FeedSync requires one. We have been working on FeedSync 2.0 just final testing taking place. It’s much more advanced and uses a database to store listing data. Subscribe to Easy Property Listings.
Thanks for your purchases.
please update your documentation!!! it is by far not relevant to the new version and we cant just trial and error everything.
Hi Ben thanks for the reminder,
I’ve updated the documentation for configuring WP All Import and FeedSync here.
Hi,
We have a one off, WordPress website project that uses Rockend REST Professional web advertising. We need to add a facility to read the REST generic XML file in our website. We are not sure where to start.
What plugins and support do we need?
Do you have an installation service that we can take advantage of?
The staging website is built. We need this to be installed to make the website go live.
Hope you can help.
Kind Regards,
Cielo
Thanks for ordering our FeedSync installation process for your real estate website.